Hello, grill lovers! There’s nothing quite like the allure of beer can chicken on a gas grill — it’s juicy, tender, and boasts a seasoned skin that’ll keep you coming back for seconds (and thirds!). As a professional food blogger and seasoned griller, I must admit, this dish is one of my favorites. The combination of the grill’s smoky aroma and the delicious chicken rub imparts an unbeatable flavor that brings out the best in the chicken.
The beauty of beer can chicken lies in its simplicity and versatility. Whether you’re using a robust, expensive craft beer or any other beer available in your fridge, the result is always a delight. Plus, with the right cooking equipment like a chicken rack or beer can chicken holder, you’re set for a grilling session that is as fun as it is tasty!
Let’s dive right into the heart of grilling beer can chicken on a gas grill!
Why Beer Can Chicken?
Grilling chicken on a gas grill is already a popular choice for many, but adding the beer can method takes it to a whole new level. The beer not only infuses the chicken with subtle flavors but also helps to keep it incredibly juicy throughout the cooking process. As the beer heats up, it creates steam that cooks the chicken from the inside, resulting in a moist and tender meat while the skin crisps up beautifully on the outside.
Recommended Cooking Equipment:
To create the best beer can chicken, you’ll need a few essential tools. Here’s a list of recommended cooking equipment:
- Gas Grill: A gas grill offers precise temperature control, making it ideal for achieving the perfect cook on your beer can chicken.
- Chicken Rack: This handy tool holds the chicken in place, ensuring it remains stable on the grill while cooking.
- Meat Thermometer: An inserted thermometer will help you monitor the internal temperature of the chicken, ensuring it reaches the safe and recommended 165°F (74°C).
- Foil: You’ll use foil to cover the chicken once it’s cooked, allowing it to rest and retain its juices.
- Beer Can Chicken Holder: This nifty gadget ensures your beer can chicken stands tall and steady on the grill.
- 9×13 Metal or Disposable Pan: This will catch any drippings from the chicken and make cleanup a breeze.
The Perfect Beer Can Chicken Recipe
Let’s dive into the step-by-step recipe for making mouthwatering beer can chicken on your gas grill:
Beer Can Chicken on a Gas Grill
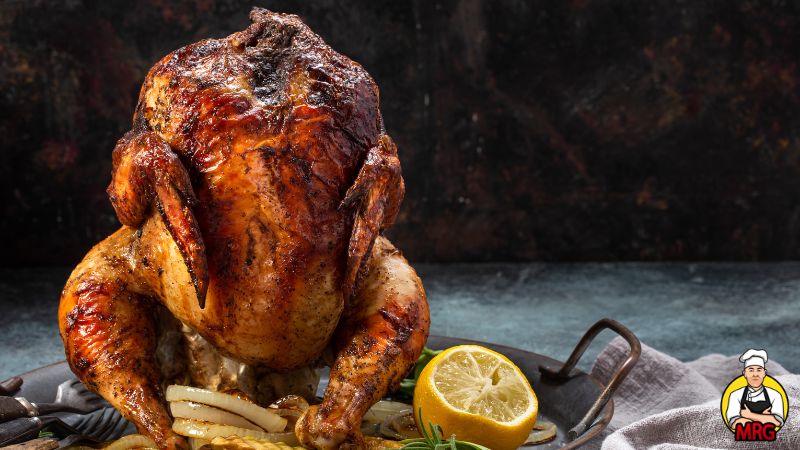
The Perfect Beer Can Chicken on a Gas Grill is a quintessential American barbecue delight that effortlessly combines flavor and fun. Grilling it on a gas grill makes the process more controlled, ensuring that every bite is a perfect mix of smoky and juicy. The beer not only adds a unique flavor but also keeps the chicken moist. It's an experience that takes grilling to the next level.
Ingredients
- 1 whole chicken (about 4-5 pounds)
- 2 tablespoons olive oil
- 1 tablespoon paprika
- 1 tablespoon garlic powder
- 1 tablespoon onion powder
- 1 tablespoon dried thyme
- 1 tablespoon dried oregano
- 1 tablespoon brown sugar
- 1 teaspoon salt
- 1 teaspoon black pepper
- 1 can of beer (any beer will do, or try a soda substitute like ginger ale or citrus soda)
- Fresh herbs (rosemary, thyme, or sage) for garnish (optional)
Instructions
- Preheat your gas grill to medium-high indirect heat, aiming for a temperature of around 375°F (190°C).
- While the grill is preheating, prepare the chicken. Rinse it thoroughly under cold water and pat it dry with paper towels.
- Mix all the dry ingredients (paprika, garlic powder, onion powder, dried thyme, dried oregano, brown sugar, salt, and black pepper) in a bowl to create the chicken rub.
- Rub the olive oil all over the chicken, making sure to coat it evenly. Then, generously apply the chicken rub to both the skin and the cavity of the chicken, ensuring it's well-seasoned.
- Open the can of beer and either drink or empty about half of it, leaving enough headspace in the can. Place the beer can in the beer can chicken holder.
- Carefully slide the chicken over the beer can, so the can is inside the chicken’s cavity, and the chicken is standing upright.
- Place the chicken with the beer can holder on the cool side of the grill, ensuring it’s stable and won’t tip over.
- Close the grill lid and cook the chicken until the internal temperature reaches 165°F (74°C) in the thickest part of the thigh, about 1 hour 15 minutes.
- Once the chicken is fully cooked, use tongs to carefully remove the beer can, and discard it. Then, cover the chicken loosely with foil and let it rest for about 10 minutes.
- Optional: Garnish with fresh herbs like rosemary, thyme, or sage before serving.
Nutrition Information:
Yield:
6Serving Size:
1Amount Per Serving: Calories: 234Total Fat: 16gSaturated Fat: 4gCholesterol: 81mgSodium: 76mgProtein: 20g
Serving Suggestions and Suitable Side Dishes
Grilled beer can chicken pairs perfectly with a variety of side dishes. Here are some fantastic options:
- Grilled Asparagus: Toss asparagus spears in olive oil, salt, and pepper, then grill them until tender-crisp and slightly charred.
- Seasoned Potatoes on the Grill: Cut potatoes into wedges or cubes, toss them in olive oil, and season with your favorite herbs and spices. Grill until crispy and golden brown.
- Smoked Stuffing: Prepare your favorite stuffing and smoke it on the grill for a smoky twist on this classic side dish.
- Grilled Bacon Wrapped Asparagus: Wrap asparagus spears with bacon and grill them until the bacon is crispy and the asparagus is tender.
- Grilled Cauliflower Steaks: Slice thick cauliflower steaks, brush with olive oil, and grill until they develop a nice char and become tender.
Useful Tips and Common Mistakes to Avoid
To ensure your beer can chicken turns out perfectly every time, keep these tips in mind:
- Preheat the Grill: Always preheat your gas grill to the correct temperature before placing the chicken on it. This ensures even cooking and a beautifully seared skin.
- Cook to the Right Temperature: Use a meat thermometer to check the internal temperature of the chicken. Overcooking can lead to dry meat, while undercooking is a food safety risk.
- Choose Any Beer: While some recipes suggest using expensive craft beer, any beer will work. Feel free to experiment with different beer flavors to find your favorite.
- Empty or Drink Half the Beer: Reducing the amount of beer in the can prevents it from overflowing or causing flare-ups on the grill.
Conclusion: Beer Can Chicken on a Gas Grill
Mastering beer can chicken on a gas grill may take a few tries, but once you get it right, it’s a meal that will always impress. Whether you’re hosting a summer BBQ, a game-day feast, or simply looking for a delicious weekend meal, this beer can chicken recipe has you covered.
Remember, half the fun of cooking is experimenting, so don’t hesitate to play around with different beers, sodas, and rubs. Keep practicing, and you’ll soon be a beer can chicken master. Happy grilling!
You might also like:
- Unveiling the Best Grilled BBQ Chicken Recipe: From Ingredients to Serving
- Grilled Chicken Drumsticks on Gas Grill: A Finger-Licking Delight
- Grilling Chicken Breast on Gas Grill: A Beginner’s Guide
- Mediterranean-Style Grilled Whole Chicken, Succulent and Flavorful
- How to Grill Boneless Skinless Chicken Thighs on Gas Grill
- How to Grill Chicken Wings on a Gas Grill: Easy Guide
- How to Grill Chicken Kabobs on a Gas Grill: A Delicious and Easy Recipe
- Rotisserie Chicken on Gas Grill: Easy Step-by-Step Guide
- Easy Smoked Chicken on Gas Grill: A Step-by-Step Guide
- Delicious Spatchcock Chicken on Gas Grill
FAQs
Will a beer can chicken fit on a Weber grill?
Absolutely, a beer can chicken will comfortably fit on a Weber grill, especially if you’re using one of their full-sized models. Just make sure to use the indirect grilling method to ensure even cooking.
What beer is better with beer can chicken?
A lager or pale ale tends to work well because they’re lighter and not overpowering. The goal is to complement the chicken’s flavors, not dominate them. Experiment to find your personal favorite!
Can you cook beer can chicken on an open fire?
Yes, you can cook beer can chicken on an open fire, but it’s more challenging to regulate the temperature. A sturdy grate and close monitoring are essential to avoid overcooking or charring.
Can you grill chicken on a grill?
Certainly! Grilling is one of the most popular methods for cooking chicken, offering a range of flavors and textures. From boneless, skinless chicken breasts to thighs and whole birds, there’s a grilled chicken option for everyone.
Can I make beer can chicken in the oven if I don’t have a gas grill?
Absolutely! You can replicate the same recipe in the oven. Set your oven to 375°F (190°C) and place the beer can chicken on a baking sheet or roasting pan. Cook until the chicken reaches the recommended internal temperature.
Can I use a soda substitute instead of beer?
Yes, you can! Ginger ale, citrus soda, or root beer can be great alternatives to beer, adding their unique flavors to the chicken.
How do I store leftover beer can chicken?
Store any leftover chicken in an airtight container in the refrigerator. Shredded or cubed chicken can be added to salads, sandwiches, or even turned into a delicious chicken salad.
Can I use a different rub for the chicken?
Absolutely! While the provided rub is flavorful and delicious, feel free to experiment with your favorite herbs and spices to create your unique blend.
Can I make beer can chicken on a charcoal grill?
Yes, you can use the same method on a charcoal grill. Follow the same steps, setting up indirect heat on the charcoal grill, and monitor the temperature closely.
Can I freeze cooked beer can chicken?
Yes, you can freeze cooked beer can chicken. Just make sure to cool it completely before storing it in an airtight container or freezer bag. It can be reheated in the oven or microwave when you’re ready to enjoy it again.
I’m Calvin Lamb, an LA-based culinary enthusiast with a decade’s experience in five-star kitchens. My innovative dishes, inspired by seasonal flavors and sustainable practices, blend classic and modern cuisine. Besides crafting unique culinary experiences, I relish exploring new eateries and devising fresh recipes.
Everything is very open with a very clear clarification of the issues. It was definitely informative. Your website is very useful. Thanks for sharing!