
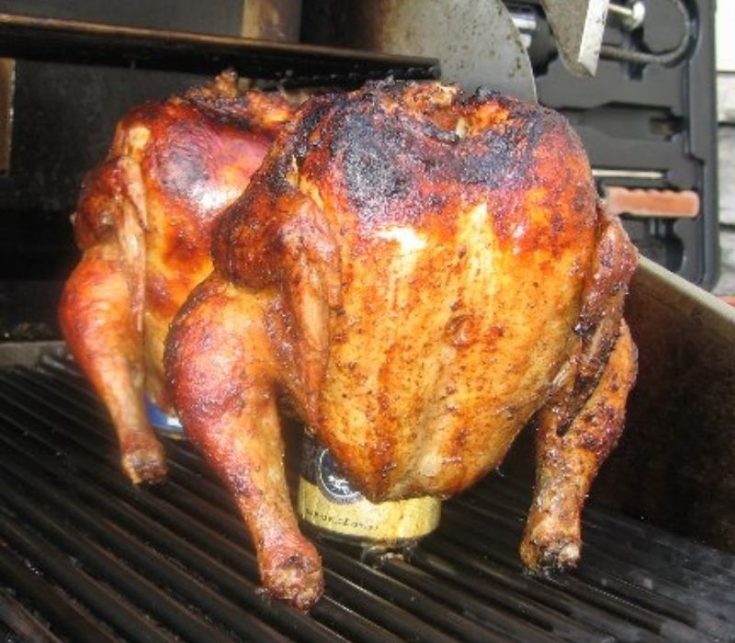
Ah, the Pit Boss Beer Can Chicken – a feast for the senses, tantalizing the taste buds with a unique smoky flavour, a crispy skin, and a succulence that leaves you craving for more. The marriage of the whole chicken and the can of beer under the low and slow heat of a Pit Boss smoker is nothing short of a gastronomical delight. This recipe is all about that and more as we unravel the secret behind this popular BBQ dish.
The Preparation
Let’s begin by preparing our star ingredient – the whole chicken. Ensure your chicken is fully defrosted and patted dry. Once you’ve done that, it’s time to move on to the seasoning. A favourite chicken rub, a mixture of garlic, onion, smoked paprika, thyme, oregano, cumin, and brown sugar provides an excellent base flavour. For those desiring an extra kick, consider adding a dash of chilli powder or cayenne pepper. This dry rub not only provides flavour but also aids in achieving that desirable crispy skin.
The Beer
Now, let’s talk about the can of beer. It is recommended to use a beer with lower alcohol content, as the purpose of the beer is not to impart a strong beer flavour, but rather to keep the chicken moist during the smoking process. Lagers, pilsners, and light ales tend to work well for this purpose. And the golden rule here is simple – use a beer you like.
For those who prefer to deviate from the traditional, a can of soda can be used instead of beer. Choose a soda with a stronger flavour that won’t overpower the chicken. The best results are often found with low-sugar soda.
The Smoking Process
Now comes the star of the show – the Pit Boss smoker. Preheat the Pit Boss smoker to 250°F, a temperature perfect for the low and slow smoking process that this recipe calls for. Once the smoker is ready, place the chicken – with the can of beer or soda firmly lodged inside the cavity – onto the smoker.
Let the chicken cook for approximately two hours at 250°F. This time might vary depending on the size of your bird, so it’s important to check the internal temperature. It’s crucial that your chicken reaches an internal temperature of 165°F to ensure that it is fully cooked. Once you reach this stage, crank up the heat to 350°F for the last 30 minutes of cooking. This will help you achieve that irresistible crispy skin.
The Side Dishes
As your chicken is smoking, it’s time to prepare the side dishes. Classic BBQ sides such as roasting potatoes, homemade potato chips, mac and cheese, grilled asparagus, and roasted corn on the cob perfectly complement the deep, smoky flavour of the beer can chicken.
Roasting potatoes in the oven or on the grill can provide a hearty, savoury side that pairs well with the smoked chicken. Homemade potato chips, crispy and slightly salty, add a different texture to your meal.
For a more creamy and cheesy accompaniment, macaroni and cheese is a popular choice. Grilled asparagus, with its slightly charred flavour and crunch, provides a healthy and tasty option. Roasted corn on the cob, preferably with a pat of butter, is a sweet and juicy addition to this BBQ feast.
Storing Leftover Beer Can Chicken
Given the flavour and juiciness of the pit, boss beer can chicken, there’s a good chance you might not have leftovers. But if you do, remember that the chicken must be refrigerated within two hours of cooking. This will ensure it remains safe to eat. Once refrigerated, the chicken should be used within four days.
Freezing the chicken is another good option. Make sure the chicken has cooled completely before transferring to an airtight container or a freezer bag to avoid condensation, which can lead to freezer burn.
Reheating Beer Can Chicken
When it comes to reheating, preheat your oven to 350°F. Use an oven-safe dish greased with cooking spray and place the chicken in the dish. Cover the chicken with aluminium foil and bake for 20 minutes. After that, remove the aluminium foil and bake for an additional 5 minutes. This will allow the skin to regain some of its crispness.
Before serving, check that the chicken is at an internal temperature of 165°F to ensure it is heated thoroughly. For an additional flavour burst, brush the chicken with your favourite BBQ sauce before baking.
Conclusion: Pit Boss Beer Can Chicken
In conclusion, the Pit Boss Beer Can Chicken is not only a unique and delicious BBQ dish but also a fun cooking experience. It’s a versatile recipe that you can customize based on your preferences, and the result is always a tender, juicy chicken with a unique smoky flavour, just like your favourite smoked ribs, chicken thighs, chicken breast, or spatchcock chicken. Whether it’s for a family BBQ, a weekend dinner, or a party with friends, the Pit Boss Beer Can Chicken is sure to be a hit. Enjoy the process, the flavours, and the compliments!
FAQs
Can I use any kind of beer for pit boss beer can chicken?
Yes, you can use any kind of beer for pit boss beer can chicken, although lighter beers like lagers or pilsners are often preferred for their milder flavor.
How long should I cook pit boss beer can chicken?
Cooking time for pit boss beer can chicken typically ranges from 1 to 1.5 hours, depending on the size of the chicken and the temperature of the grill.
Can I use something other than beer for beer can chicken?
Absolutely! You can substitute beer with soda, broth, or even wine. Each offers a unique flavor to the chicken.
What sides go well with pit boss beer can chicken?
Classic BBQ sides like coleslaw, baked beans, cornbread, and potato salad complement pit boss beer can chicken perfectly.
How should I store leftover pit boss beer can chicken?
Cool the chicken, then store in an airtight container in the refrigerator for up to 3-4 days.
How can I reheat leftover pit boss beer can chicken?
For best results, reheat in an oven at 350°F until warmed through, ensuring it retains moisture and flavor.
How long does it take to smoke a beer can chicken?
Smoking a beer can chicken generally takes between 2 to 3 hours, depending on size and smoker temperature.
How long does it take to cook a chicken on a Pit Boss grill?
Cooking a whole chicken on a Pit Boss grill typically takes between 1 to 1.5 hours, based on size and grill temperature.
What temperature do you cook chicken on a Pit Boss smoker?
Chicken is best smoked on a Pit Boss at a temperature of 250°F to 275°F until it reaches an internal temperature of 165°F.
How to cook chicken on a Pit Boss grill?
To cook chicken on a Pit Boss grill, season the chicken, preheat the grill to medium heat, place the chicken on the grill, and cook until the internal temperature reaches 165°F, turning occasionally for even cooking.
Pit Boss Beer Can Chicken
Pit Boss Beer Can Chicken – a dish that's more than a meal, it's an experience. Get ready to tantalize your taste buds with the symphony of flavors, succulent textures, and the captivating aroma of the grill. If you're ready to embark on a culinary adventure, let's get started!
Ingredients
- 1 whole chicken (4-5 pounds)
- 1 can of beer (choose a lager, pilsner, or light ale with your preferred flavor profile)
- Olive oil (for brushing)
- Salt and black pepper (to taste)
Chicken rub:
- 1 tablespoon garlic powder
- 1 tablespoon onion powder
- 1 tablespoon smoked paprika
- 1 teaspoon dried thyme
- 1 teaspoon dried oregano
- 1/2 teaspoon ground cumin
- 1 tablespoon brown sugar
- Optional: 1/2 teaspoon chili powder or cayenne pepper for a kick
Instructions
1. Preparation:
- Ensure the chicken is fully defrosted and patted dry.
- In a small bowl, mix together all the chicken rub ingredients.
- Brush the chicken with olive oil to help the rub adhere.
2. Seasoning:
- Generously apply the prepared chicken rub all over the chicken, including the cavity.
- If using, sprinkle the optional chili powder or cayenne pepper for an extra kick.
- Let the chicken sit with the rub for about 15 minutes to allow the flavors to meld.
3. Beer Can Prep:
- Pop open the can of beer and take a few sips (or just drink it down to the level where you feel comfortable!).
- Set the beer can on a flat surface and gently slide the chicken cavity over the can, creating a "chicken throne."
4. Fire Up the Pit Boss:
- Preheat your Pit Boss smoker to 250°F (120°C). The low and slow cooking temperature is key to achieving that juicy tenderness.
5. Cooking:
- Place the chicken, seated on the beer can, onto the smoker grate.
- Let the chicken cook for about 2 hours at 250°F. Keep an eye on the internal temperature; the chicken should reach 165°F (74°C) to be fully cooked.
- For the final 30 minutes of cooking, increase the temperature to 350°F (175°C) to achieve that crispy skin that's the hallmark of a perfect beer can chicken.
6. Savor the Aromas:
- As the fragrant smoke swirls around, prepare your taste buds for a feast.
7. Serve and Enjoy:
- Carefully remove the chicken from the smoker, and let it rest for a few minutes before carving.
- Carve and serve your Pit Boss Beer Can Chicken alongside your favorite BBQ sides for a complete, soul-satisfying meal.
Nutrition Information:
Yield:
4Amount Per Serving: Calories: 350Total Fat: 24gCarbohydrates: 2gFiber: 1gSugar: 1gProtein: 30g
Related Article:


I’m Calvin Lamb, an LA-based culinary enthusiast with a decade’s experience in five-star kitchens. My innovative dishes, inspired by seasonal flavors and sustainable practices, blend classic and modern cuisine. Besides crafting unique culinary experiences, I relish exploring new eateries and devising fresh recipes.